As we continue our walk through Graphium onboarding, our team is thrilled to welcome Bobby Wong, founder and president of Neximatics to discuss Vitals Machine Integration.
We’ve been walking through our onboarding project plans for new Graphium Health anesthesia customers. At this point, we’ve identified the organization and the facility names, which we discussed in our previous episode, which was about the client info pack. The info pack contains a special section that isn’t always necessary, but is required when the client needs vitals integration: the Vitals Site Survey.
The Three Areas of the Site Survey
In order to pull vitals sign data out of your facility’s machines and stream the data into the Graphium record, we need to gather a few key pieces of information. The information is all gathered in three areas of the Site Survey:
- Site Information
- Network Details
- Rooms & Devices
Site Information
While this page should be fairly straightforward, we also know that in any facility, there are different people working together. So, sometimes we may need to get the information of the site manager, sometimes it is the bio-med, sometimes it’s the IT department, which might be in-house or outsourced. Finding the right people might be the biggest challenge here, but what we need to do is get a good solid list of contact information so that, when we have a question, we know whom to contact. While it’s a simple step, this piece will, in the end, save you a lot of time and effort.
The other important piece of the Site Information is determining and listing the target go-Live date. Because we receive a lot of site surveys every month, this date—even if it’s a rough estimate—allows us to understand the urgency of and prioritize your project as necessary.
Network Details
To help understand the vitals integration work a little better, you can think of it as a piece of the “Internet of Things” (IoT) that is attached to the medical devices. One of the requirements, then, is connecting to the internet or the network in the facility.
In this section, you’ll help us understand what is your networking infrastructure inside your facilities. With this information, we’ll be able to pre-program our devices to work with your network. Our devices can be connected to WiFi, or they can connected via Ethernet. If we’ll be using a WiFi connection, we need to ensure that the connection is very robust. In other words, we don’t want to have our device on the guest network that may not be as robust or as closely monitored for issues as something more ideal like a corporate network. Keep in mind, though, that we will be able to support all necessary encryptions on the WiFi. If you know you’re protecting your network via WPA2, PSK, or WPA2 Enterprise please specify that here.
We also support static IP, if this is something that you would like to do, but please understand: our devices are not medical devices that require a free line and a static IP. Our devices can be on DHCP, which is actually our preferred setup and, hopefully, is easier to manage on your end.
Rooms and Medical Devices
Any room where you practice anesthesia may have devices from any number of manufacturers—GE, Philips, Mindray, etc.—and each of those manufacturers has its own protocol and its own port that we need to connect to. That’s why, in this section, we’ll gather a list of all the rooms where anesthesia is practiced along with all the medical devices and their makes & models. With this data, we’ll know how to program our devices before we ship them to your site.
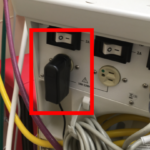
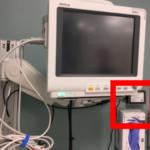
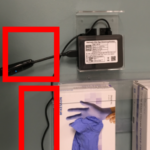
Now, sometimes when you look at a medical device, especially some of the older models, the make and model may not be so apparent from the front of it. We’ve found that the easiest method of communicating what we need is for you to send, along with the previously mentioned information, some photos of your medical devices. From the sample photos below, we can see whether your device is mobile (in which case you’d need to add a power outlet) or what ports are available and which are being used. For many installations, we see the port that we need and know we are good to move forward, but in some instances a port that we need is already occupied. These photos give us the information we need to begin a dialogue with bio-med. All of this makes the installation easy and seamless for you.
Information For The IT Team
Now that you’ve collected all the information we need from you, we’ll also have information to share with your IT department. If your site has a firewall or any other security appliance, your team will need to know the IP addresses to which the Nexi (Neximatic’s streaming device) will push data. Because the device only sends outbound traffic, we are not exposing any of your systems’ internal IPs. We’ll give the IT team the three IPs, which are the Neximatic servers, and we only use port 443 for the outbound traffic.
Additional Considerations
Ideally, the Nexi will be powered by being plugged into the back of the anesthesia machine so that the Nexi, the anesthesia machine and the patient monitor can all be together. But when you start moving, for instance, from the OR to the PACU, you may have a different Nexi with a different setup. If a monitor is already on a wheeler that needs to be plugged into the wall, we recommend installing a medical grade power strip onto the wheeler. You’ll plug the monitor and the Nexi both into the power strip, and then you only need to plug in the power strip to the wall inside the next room. The advantages to this setup are 1) you’ll leave other power in the room available and 2) you can manage all of your devices in one place.
Installation
We’ll send out the information pack as soon as possible to the appropriate points of contact. The information we need should be straightforward, and as soon as we get the information back, the installation is actually very fast.
How? Based on your information, we pre-program everything beforehand and we send you a package for each room with everything you need. For example, you’ll receive a package for OR-1, OR-2, and PACU-1, if those are the rooms you’ve defined in your information pack. In each room’s package, you’ll have the cable for the medical device, the Nexi, the power cable, and the printed instructions. All you need to do is plug in the power and connect the cable per the instructions on the print out. It all takes about 10-15 minutes. The first thing to do after you put everything in place is to hook up to a pulse ox monitor to generate some data and see the process work. On our end, then, we’ll be able to see which rooms got installed that day and track the progress of the installation. At a typical surgery center, which has five or six rooms, you can complete the entire installation in one-and-a half hours.
About Bobby Wong and Neximatic
Bobby Wong is the founder and the president of Neximatic. Neximatic offers vital signs streaming by connecting their device to the medical devices in your facilities, and they’re able to pull the data out and stream it into an electronic health record, like the Graphium Health systems.

Listen to the Time Out with Dr. Z Podcast

The Time Out with Dr. Z YouTube Channel